

Overview
This guide shows you how to explore the API portal interface and test an API (in this case, the Student-API endpoint) directly from the sandbox—no code or external tools required.
But first, a primer on endpoints:
An endpoint is the specific location we send a request to, in order to interact with an API. It acts as the interface between a request and the server that’s hosting the API, and usually represents the set of operations that can be implemented through the API.
Step 1: Navigate to the API
- Sign in to the Developer Portal. You won’t be able to interact with the portal without signing in first.
- Go to the API catalogue. You will see the following sections:
- Quick start – Guides to help you learn about the API sandbox
- My applications – Create and manage application keys and view activity logs
- API catalogue – Non-production versions of the APIs exposed by Data Hub for department systems
- QTeachers catalogue – Non-production versions of the APIs exposed by the QTeachers system
- In the API catalogue section select Consent Management.
- You will see a list of API groups and their endpoints. You can download the API specifications by clicking the download icon.
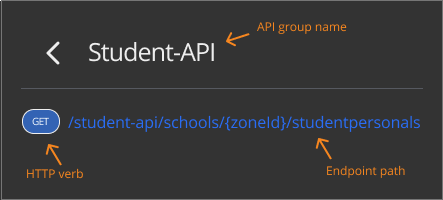
- Locate and click the Student-API group and select the endpoint:
GET/student-api/schools/{zoneId}/studentpersonals
This will take you to the API portal, where you can test the endpoint.
Step 2: Explore the portal interface
The portal interface is divided into several sections:
- Endpoint displays the API group name, HTTP verb, and endpoint path
- Model shows the data model in JSON format
- Request displays input parameters and includes Clear and Execute buttons
- Response displays the response from the API in JSON format
Step 3: Explore the model
Review the model section to see the structure of the StudentPersonal object returned by this API.
Understanding the model helps you know what data to expect in the response.
Example schema:
{
  "StudentPersonal": [
    {
      "LocalId": "string",
      "StateProvinceId": "string",
      "OtherIdList": [
        {
          "Type": "string",
          "Value": "string"
        }
      ],
      "PersonInfo": {
        "Name": {
          "Type": "string",
          "FamilyName": "string",
          "GivenName": "string",
          "PreferredFamilyName": "string",
          "PreferredGivenName": "string",
          "FullName": "string"
        },
        "Demographics": {
          "BirthDate": "string"
        }
      },
      "MostRecent": {
        "SchoolLocalId": "string",
        "YearLevel": {
          "Code": "string"
        },
        "Homegroup": "string"
      },
      "SIF_ExtendedElements": [
        {
          "Name": "string",
          "Text": [
            {}
          ]
        }
      ],
      "IndependentStudent": "string",
      "MedicalCondition": "string",
      "Indigenous": "string"
    }
  ]
}
Step 4: Provide input parameters
Scroll to the request section and you will see a list of input parameters.
At the moment, you don’t need to enter any input parameters to execute the request. You can leave optional fields empty unless you want to filter your results.
Step 5: Execute the request
Scroll to the bottom of the request section and you will see
- a button to clear the form of data
- a button to execute your request.
When you click execute, the portal will call the API in real time.
Step 6: View the response
Scroll to the response section and you will see:
- The response status code, for example ‘200 OK’ means the request was successful.
- The response body, that is, the JSON data returned by the API.
Example response:
{
  "StudentPersonal": [
    {
      "LocalId": "590529",
      "StateProvinceId": "QLD",
      "OtherIdList": [
        {
          "Type": "TFN",
          "Value": "416665353"
        }
      ],
      "PersonInfo": {
        "Name": {
          "Type": "A",
          "FamilyName": "Kuvalis",
          "GivenName": "John",
          "PreferredFamilyName": "Kihn",
          "PreferredGivenName": "Seamus",
          "FullName": "Adriana Romaguera"
        },
        "Demographics": {
          "BirthDate": "2021-09-08T04:07:47.303Z"
        }
      },
      "MostRecent": {
        "SchoolLocalId": "358588",
        "YearLevel": {
          "code": "7",
          "description": "Year 3"
        },
        "Homegroup": "Simpsons"
      },
      "SIF_ExtendedElements": [
        {
          "Name": "0360669844",
          "Text": [
            "Some sample text..."
          ]
        }
      ],
      "IndependentStudent": "Y",
      "MedicalCondition": "N",
      "Indigenous": "Y"
    }
  ]
}
Next steps
Once you have successfully tested the API in the portal, you can:
- Experiment with different parameters: Try different
zoneId,yearLevel, andhomeGroupvalues to explore responses. - Test other endpoints: Explore additional API groups in the portal to understand their models and parameters.
- Integrate into your application: Use the input parameters and response format as a guide to integrate the API in your code or Postman collections.
- Save and share requests: Document the request and response examples for your team.
- Monitor and troubleshoot: Review API responses carefully to handle errors, missing data, or permission issues.
- Apply for live credentials: Once your testing is complete, request security credentials to interact with live department systems.
